Deploying An ML Model With FastAPI — A Succinct Guide

How to use an NLP model as an API — the smart, production-ready way.
 on [Unsplash](https://unsplash.com?utm_source=medium&utm_medium=referral)](https://cdn-images-1.medium.com/max/10944/0*CMrJe-Z2RiTARj4R)
FastAPI is a newer, better way to deploy your machine learning model as a REST API for use in web apps. In their official documentation, they claim to be the fastest way to get up and running in production, and naturally, this had piqued my interest.
Ready to explore this new library, I went ahead and took a simple NLP model with spacy and tried to build an API around it. I will be honest when I say that it was fairly easy and extremely convenient with the myriad of helpful functions and I was ready with the API — along with the tests, and that too without Postman or CURL— in less than hour.
Hyped enough? Down below I describe the steps that you can take to do the same with your own ML models.
👇 Let’s go!
Setting up your environment
Two simple steps to set up your virtual environment:
- Activate a new pipenv env:
pipenv shell
- Install the libraries within it:
pipenv install spacy spacytextblob pydantic fastapi uvicorn
Building the model
While trying out any new library, I am always more focused on exploring the exact functionality that the library is offering and less on the background details.
For this reason, I only built a simple sentiment analysis model with spacy with minimal setup to just quickly have a model to get predictions from.
This is the full code of the model, defined in a module called model.py.
import spacy
from spacytextblob import SpacyTextBlob
from pydantic import BaseModel

class SentimentQueryModel(BaseModel):
    text : str

class SentimentModel:
    def get_sentiment(self, text):
        nlp = spacy.load('en_core_web_sm')
        spacy_text_blob = SpacyTextBlob()
        nlp.add_pipe(spacy_text_blob)

doc = nlp(text)

polarity = doc._.sentiment.polarity
        subjectivity = doc._.sentiment.subjectivity

return polarity, subjectivity
Yes, this is really it. If you’re starting out with FastAPI like me, I would recommend exploring the API and its features with this simple model and then moving on to more complex, bigger ones.
I’ll briefly explain the code:
We import the libraries needed for the project first
SentimentQueryModel is simply a model to contain our only query for this model — the text that we will be predicting the sentiment for. Pydantic library is helpful in making sure we can quickly have a field with the data we need for our model — which will be the text variable. The FastAPI docs also describe numerous ways to declare data fields using this library.
SentimentModel is the class that loads the spacy tokeniser and the spacytextblob library and performs the sentiment prediction for the text
The two main components of the sentiment analysis scores are:
Polarity — it is a float which lies in the range of [-1,1] where 1 means a wholly positive statement and -1 means a wholly negative statement.
Subjectivity — ‘subjective’ sentences generally refer to personal opinion, emotion or judgment whereas ‘objective’ refers to factual information. Subjectivity component is a float which lies in the range of [0,1].
Now that we’ve returned the two scores from our model, let’s go to the part where we actually build our API.
Making the API
First, we import our libraries and modules:
import uvicornfrom fastapi
import FastAPIfrom model
import SentimentModel, SentimentQueryModel
Then we instantiate our FastAPI object and our prediction class:
app = FastAPI()
model = SentimentModel()
Finally, we make a new function to get preductions via a POST request:
@app.post('/predict')
def predict(data: SentimentQueryModel):
    data = data.dict()
    polarity, subjectivity = model.get_sentiment(data['text'])
    return { 'polarity': polarity,
             'subjectivity': subjectivity
           }
data.dict() makes sure that we can access our text string object from within the POST function as a JSON object.
After we get the scores, we simply return them as another dictionary object.
And now that we’re done, we go ahead and run the app with this line:
if __name__ == '__main__':
    uvicorn.run(app, host='127.0.0.1', port=8000)
And we’re done! This is the complete code and your API is ready to be tested.
Concluding →Testing your API
This was one of the most exciting parts of learning to use FastAPI. Apparently, with its integration with SwaggerUI, you can directly test the API without any external tools like Postman or the terminal command CURL.
Navigate to the address http://127.0.0.1:8000/docsto see your API in action. Presss the Try it out button.
It should look something like this:
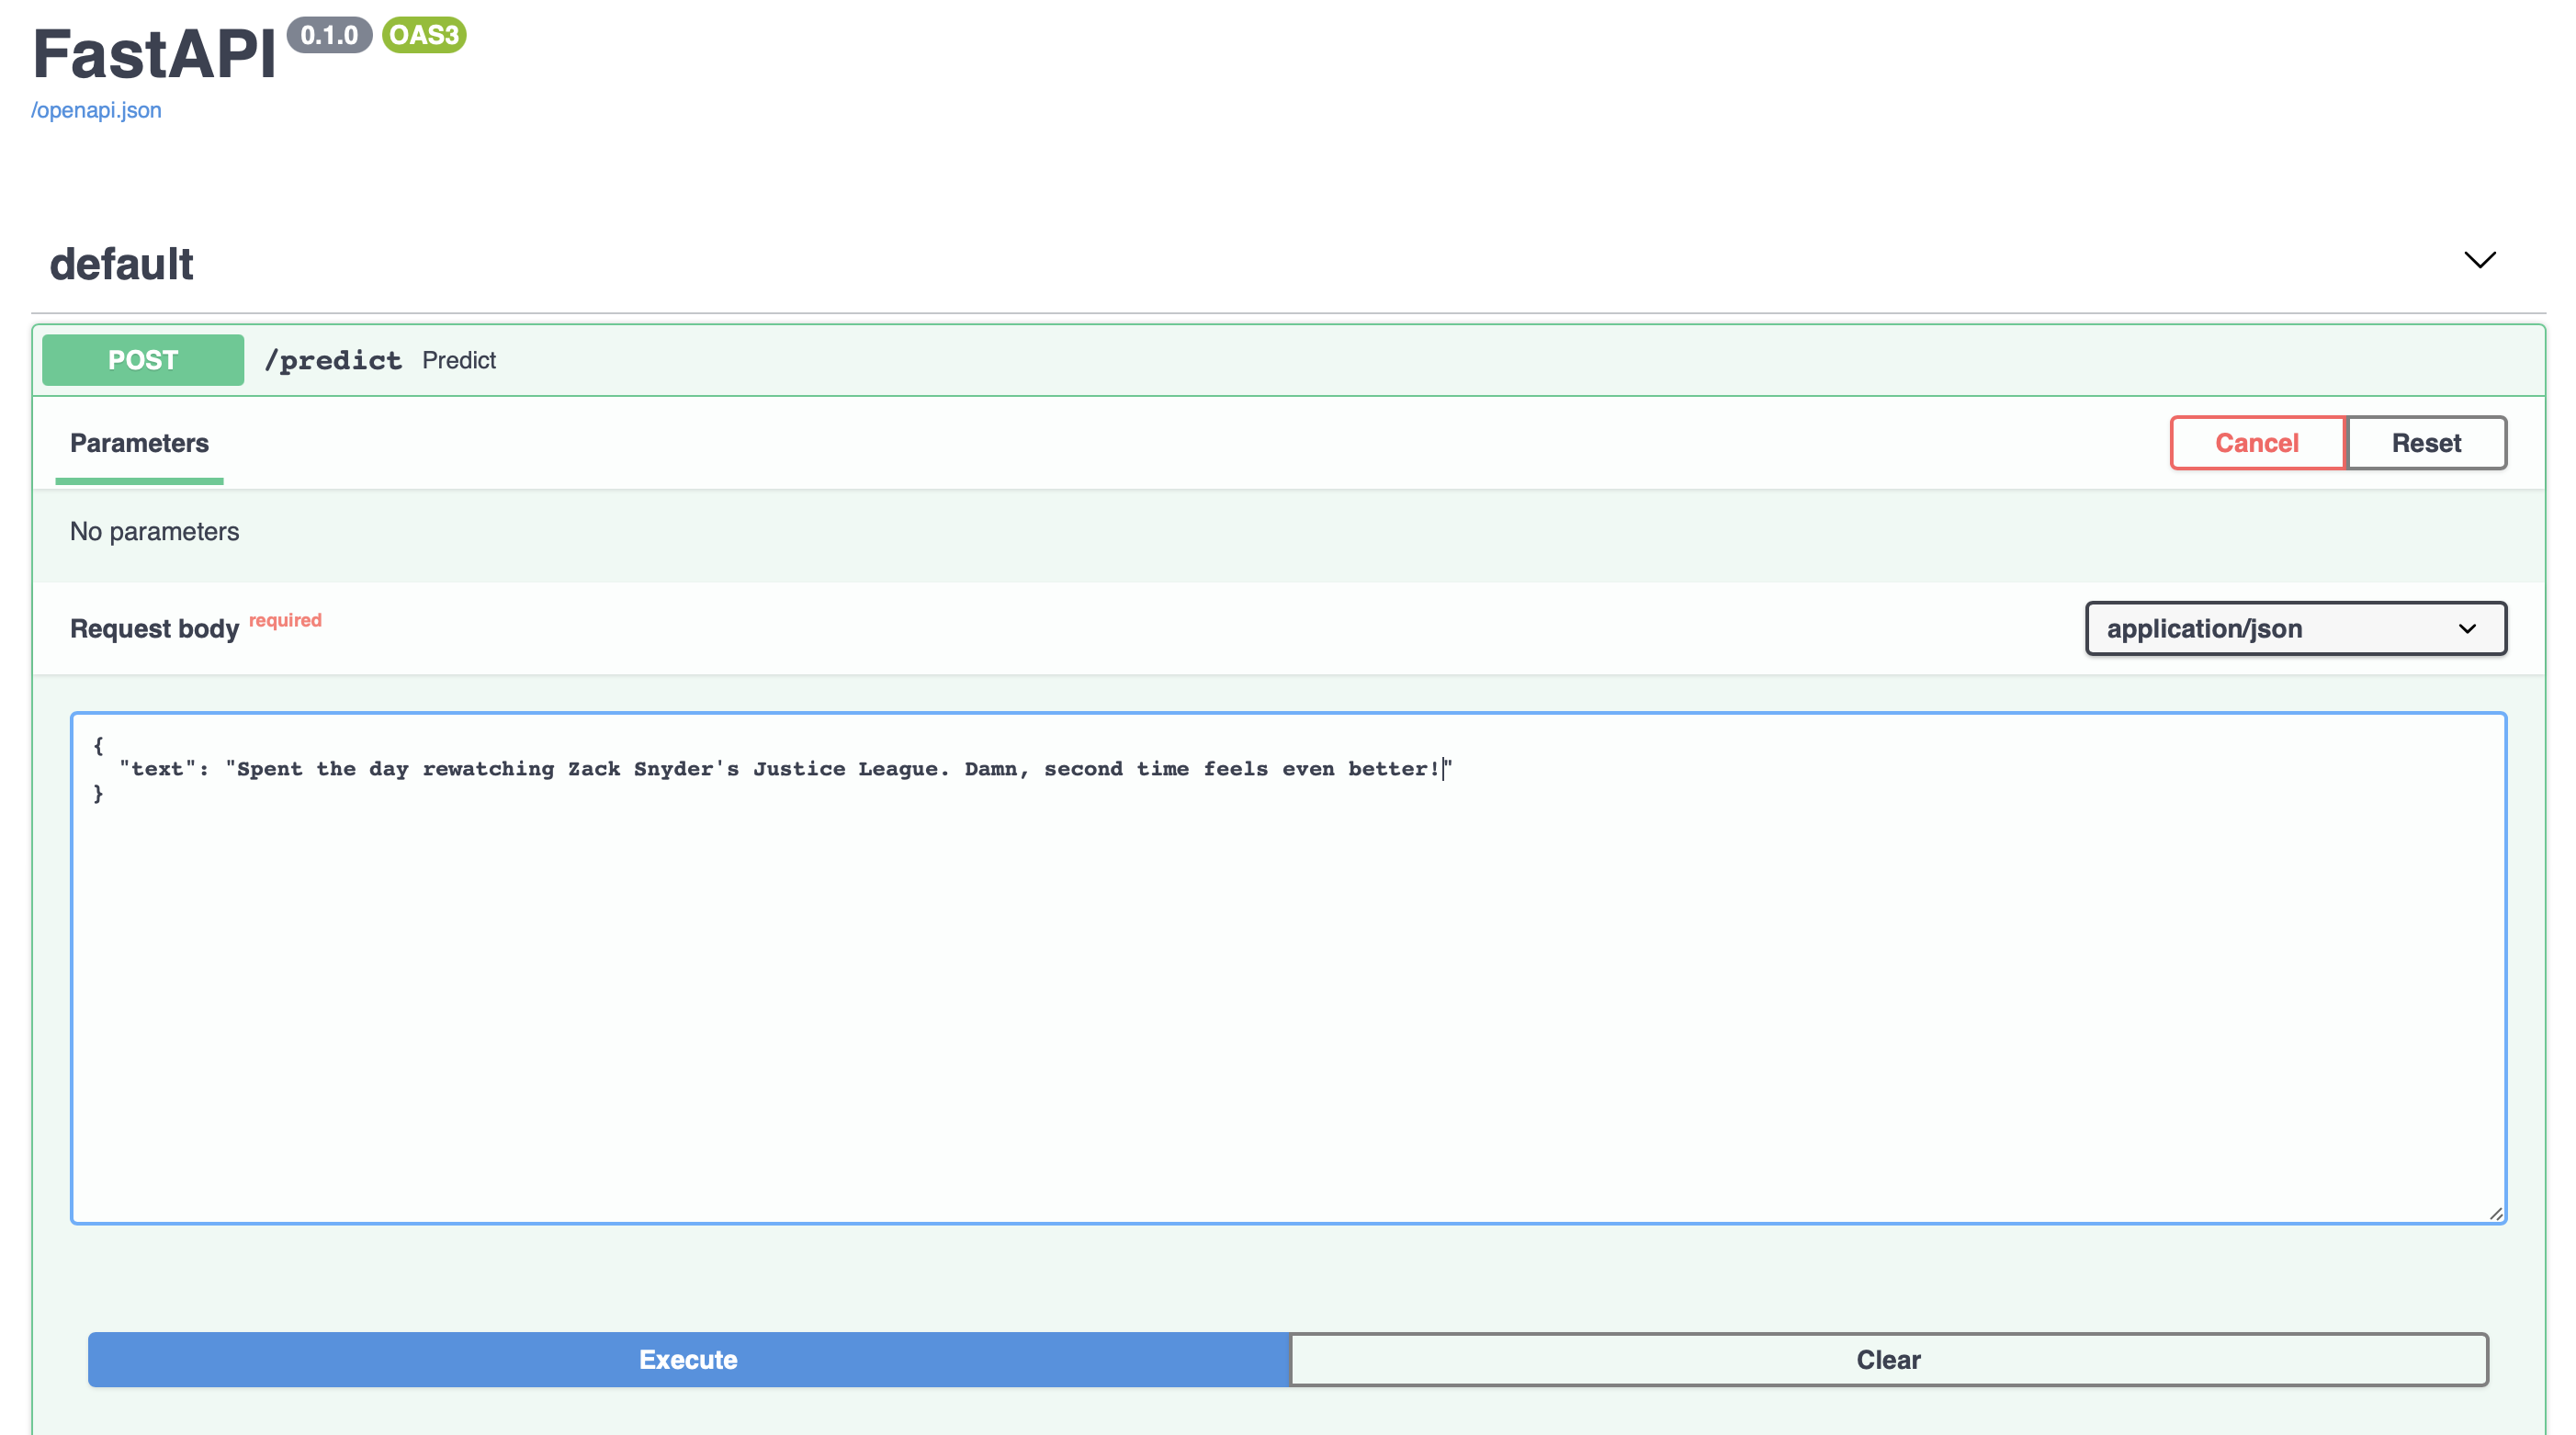
Go ahead and enter your text in the field.
Finally, press Execute.
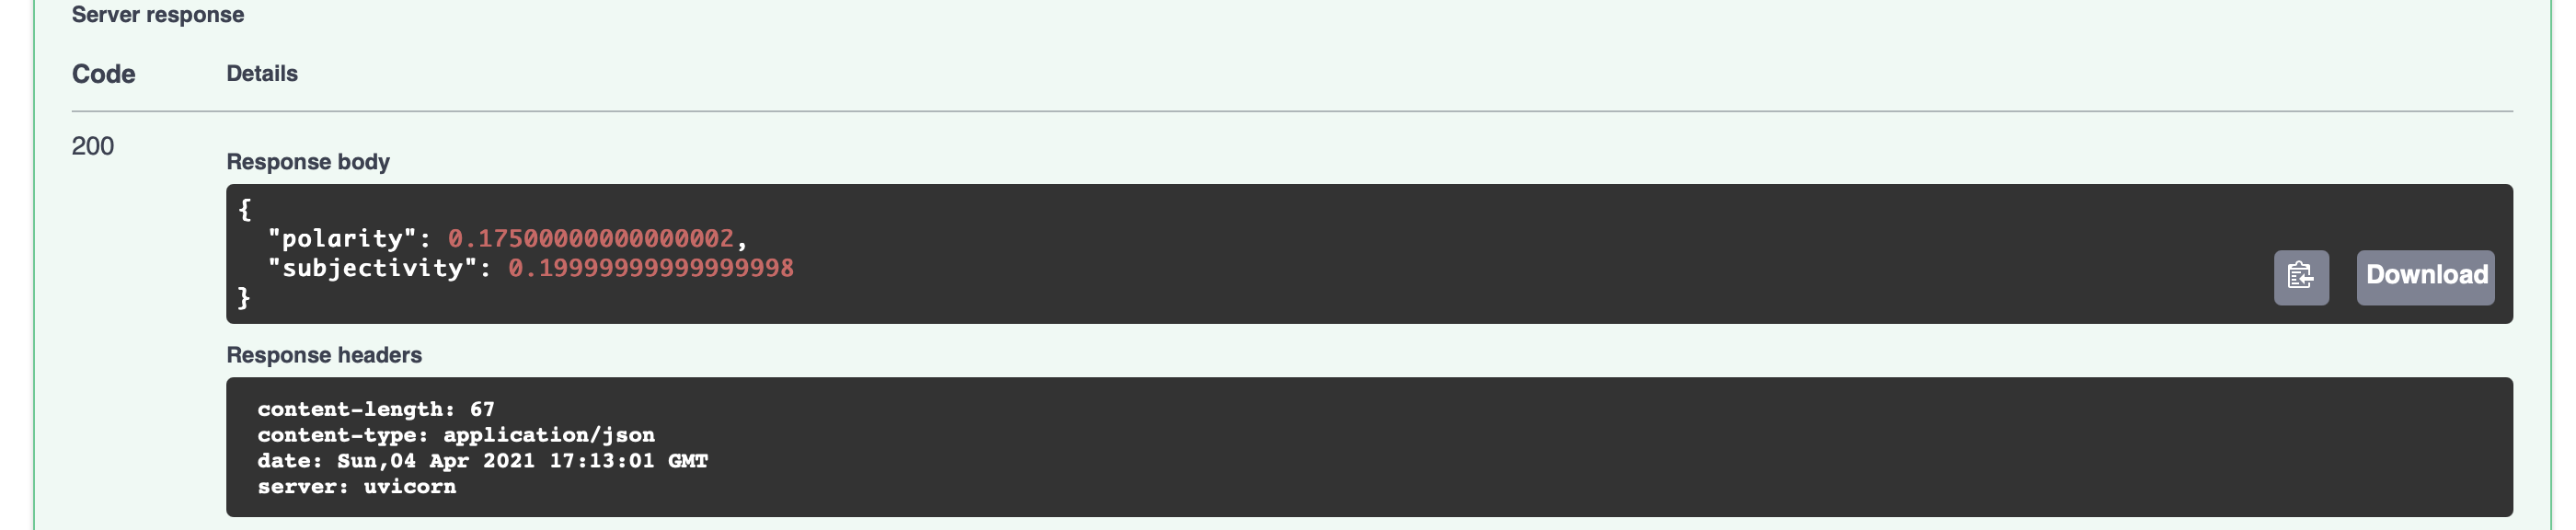
And there you have it! The predictions, right there with the response code returned in your browser itself. Wasn’t that amazing?
Rest assured, I will be exploring this library extensively in the future too!
The entire code is also available at this gist.
However, if you’ve followed along up to this point, you should already have a workable code to start building your own API!
Thanks for reading! :)
Learning Data science alone can be hard. Follow me and let’s make it fun together. 😁 Connect with me on Twitter.
Here is the codebase of all my Data Science stories. Happy learning! ⭐️
Also, check out another article of mine that you might be interested in: Making Your First Kaggle Submission An easy-to-understand guide to getting started with competitions and successfully modelling and making your first…towardsdatascience.com


